vague memory

うろ覚えを無くしていこうともがき苦しむ人の備忘録

New Relic の Drop Rule Explorer

New Relic に “Drop filter rule” という NRDB 登録前にデータを破棄する機能があります。

対象が Log であれば WebUI が提供されていますが、メトリックやイベントに対する filter rule を管理する WebUI は提供されていません。 そのため WebUIで行う場合は GraphQL API を作成・実行できる “NerdGraph API explorer を使用することになります。

Drop filter rule に焦点を当てた App ではないですし、JSONでの返却のため一覧をサクッと確認したいというような用途には向いていないと思います。


New Relic One Applications

New Relic には、 WebUI をカスタマイズできる機能があり、様々なアプリケーションが公開されています。

自作することも可能です。

上記サイトには Drop filter rule に関するアプリは公開されていないようでした。 そのため自作を考えましたが、需要はありそうということで探してみた所、Drop Rule Explorer を見つけました。

NR1 Drop Rule Explorer

New Relic Experimental で公開されています。 他にも色々置いてあります(名前の通り “実験的機能” なので、不具合がある可能性があります。)

NR1 CLI のインストール

Drop Rule Explorer をデプロイするには `New Relic One (nr1) CLI が必要になります。

公式ドキュメント、Quick start の記載に沿ってインストールします。

  • API キーの払い出し・選択時に利用規約への同意が必要です。
    • 実施しておかないと nr1 コマンドの実行に失敗します。
  • nodejs が導入されている必要があります。
    • nr1 は v16 でビルドされているようです。 今回の環境では v20.9.0 でしたが動作しました。
  • X86 のみの提供です。
    • ARM ではインストールできません。”No package nr1 available.” となります。
$ grep PRETTY_NAME /etc/os-release
PRETTY_NAME="Debian GNU/Linux 12 (bookworm)"
$ node -v
v20.9.0
$ nr1 version
@datanerd/nr1/2.83.5 linux-x64 node-v16.11.1

Credential 登録

  • API キーの選択と利用規約への同意が済んでいれば、 Quick start 上 “4. Save your credentials” の変数部分が置き換わり、そのまま実行できます。
nr1 profiles:add --name {account-slug} --api-key {api-key} --region {us|eu}

初回実行時に使用状況データの収集可否を聞かれるので、適宜回答します。 config:set でも設定可能です。

nr1 config:set --key=sendUsageData --value=DISALLOW

また、各種設定ファイルは ~/.newrelic/ に生成されます。

$ ls ~/.newrelic/
config.json  credentials.json  default-profile.json

profile 登録が行われると各種 nr1 コマンドの実行が可能になります。

$ nr1 profiles:add --name account-9999999 --api-key NRAK-XXXXX --region us
 ✔  Added profile account-9999999.
This is the first profile created, so it will be used by default from now on. Run nr1 profiles:default to choose a default profile.

$ nr1 profiles:list
Name                       Region  API key
-------------------------  ------  --------
account-9999999 (default)  us      <hidden>

$

Drop rule explorer のインストール

Git clone し、UUID払い出しと、New Relic への 公開 を行います。

$ git clone https://github.com/newrelic-experimental/nr1-drop-rule-explorer.git
$ cd nr1-drop-rule-explorer/
$ nr1 nerdpack:uuid -gf
$ nr1 nerdpack:publish

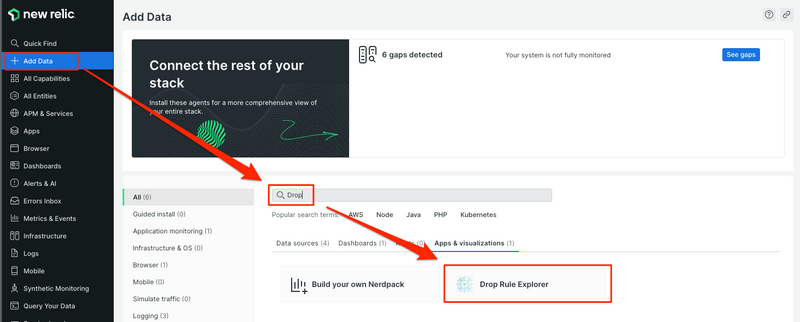
正常に publish が行われると、 New Relic 上で選択できるようになります。

Appを追加します。

Apps から利用できるようになります。

機能

  • すべての Drop filter rule の一覧表示
  • Drop filter rule の作成・削除

  • Nerd Graph API クエリ/ Terraform HCL 例の出力

削除 (おまけ)

# nerdpack id の確認
$ nr1 subscription:list | grep "Drop Rule Explorer"
0.1.2                xxxxxxxx-xxxx-xxxx-xxxx-xxxxxxxxxxxx  Drop Rule Explorer                               3 hours ago    9999999999

# 削除
$ nr1 subscription:unset -i xxxxxxxx-xxxx-xxxx-xxxx-xxxxxxxxxxxx
Unsubscribed account 9999999 from the nerdpack xxxxxxxx-xxxx-xxxx-xxxx-xxxxxxxxxxxx

# subscription:unset の alias
#ALIASES
#  $ nr1 nerdpack:unsubscribe
#  $ nr1 subscription:delete
#  $ nr1 subscription:remove
#  $ nr1 subscription:rm

まとめ

Drop rule explorer を導入すると、 Drop filter rule の管理が WebUI 上で行なえます。

標準UIまたはAppとして提供されていても良さそうですが、現状は実験的機能に分類されています。 導入に一手間掛かるのでカタログに追加して欲しい所です。

他にも様々な Apps が公開されていますので、探してみるとニーズに合った機能が見つかるかもしれません。

Datadog Rollup 関数の起点を変更する (Calendar interval)

Datadog UI 上でポチポチしていたら偶然気付いたのですが、 Datadog の rollup 関数でタイムゾーンと開始タイミングを指定できるようになっています。

Rollup関数

グラフでデータポイントのロールアップを強制できる rollup() 関数があります。

現時点ではドキュメントは更新されていないようでした。

  • Rollup
    • The function takes two parameters, <AGGREGATOR> and optionally <INTERVAL>.rollup(<AGGREGATOR>,<INTERVAL>) or .rollup(<AGGREGATOR>).

リポジトリにそれらしき更新予定があったので近い内に記載されると思います。

Calendar interval と呼ぶようです。

Calendar interval

rollup を指定した際に見慣れない項目があります。

日次、週次、月次、年次が選択できます。

  • every
    • Choose to rollup your data into seconds, minutes, hours.
  • daily, weekly, monthly, yearly
    • Rollup your data into single-{day, week, month, year} buckets.

◯次を選ぶとタイムゾーンと開始タイミングを選択できます。

数式例

# rollup with calendar interval

.rollup(AGGREGATOR, CALENDAR, [CALENDAR_INTERVAL], [TIMEZONE])
  • daily
  • weekly
    • 曜日 (sunday, ..., saturday)
  • monthly
    • 日 (1st, 2nd, 3rd, 4th, ..., 31st)
  • yearly
    • 月 (janualy, ..., december)

これまでは rollup を利用すると起点が UTC 00:00 固定になっていました。 every を指定することでこれまで同様の動作となります。既存のグラフで rollup を使用していた箇所も every となっていました。

今後は集計値を取る際に、タイムゾーン・起点を指定できるようになるため、柔軟なグラフが作成できるようになります。

Terraform import の generate-config-out オプション

Terraform v1.5 から実験的機能として generate-config-out が追加されています。

Import - Generating Configuration | Terraform | HashiCorp Developer

既存リソースの HCL を出力する機能で、個人的には待望の機能です。

import 自体の利用頻度は低いのですが、頻度が少ない故煩雑になりがちな作業が無くなるので大変喜ばしいです。


検証環境

今回は Terraform v1.6.1 と aws provider で試しています。

% terraform version
Terraform v1.6.1
on darwin_arm64
+ provider registry.terraform.io/hashicorp/aws v5.21.0

以下の S3 バケットAWS上に作成されている状態です。

これらを -generate-config-out オプションで取り込みます。

example-tf-generate-config-root-123456789012
example-tf-generate-config-mod1-123456789012
example-tf-generate-config-mod2-123456789012
example-tf-generate-config-mod3-123456789012
example-tf-generate-config-prefix-20231014024553631000000001

基本

import ブロックを記述します。

import {
    id = "example-tf-generate-config-root-123456789012"
    to = aws_s3_bucket.this
}

aws provider では既にドキュメントにも import ブロックが記載されています。

例: s3_bucket#import

この状態で terraform plan -generate-config-out=generated.tf を実行します。

% terraform plan -generate-config-out=generated.tf
aws_s3_bucket.this: Preparing import... [id=example-tf-generate-config-root-123456789012]
aws_s3_bucket.this: Refreshing state... [id=example-tf-generate-config-root-123456789012]

Terraform will perform the following actions:

  # aws_s3_bucket.this will be imported
  # (config will be generated)
    resource "aws_s3_bucket" "this" {
... (略)

Plan: 1 to import, 0 to add, 0 to change, 0 to destroy.
╷
│ Warning: Config generation is experimental
│
│ Generating configuration during import is currently experimental, and the generated
│ configuration format may change in future versions.
╵

────────────────────────────────────────────────────────────────────────────────────────────

Terraform has generated configuration and written it to generated.tf. Please review the
configuration and edit it as necessary before adding it to version control.

Note: You didn't use the -out option to save this plan, so Terraform can't guarantee to take
exactly these actions if you run "terraform apply" now.

指定したファイル名で tf ファイルが生成されます。

% cat generated.tf
# __generated__ by Terraform
# Please review these resources and move them into your main configuration files.

# __generated__ by Terraform from "example-tf-generate-config-root-123456789012"
resource "aws_s3_bucket" "this" {
  bucket              = "example-tf-generate-config-root-123456789012"
  bucket_prefix       = null
  force_destroy       = null
  object_lock_enabled = false
  tags                = {}
  tags_all            = {}
}

生成された tf ファイルを使用し、apply で state へ取り込みます。

% terraform apply
aws_s3_bucket.this: Preparing import... [id=example-tf-generate-config-root-123456789012]
aws_s3_bucket.this: Refreshing state... [id=example-tf-generate-config-root-123456789012]

Terraform will perform the following actions:

  # aws_s3_bucket.this will be imported
    resource "aws_s3_bucket" "this" {
        arn                         = "arn:aws:s3:::example-tf-generate-config-root-123456789012"
...(略)

Plan: 1 to import, 0 to add, 0 to change, 0 to destroy.

Do you want to perform these actions?
  Terraform will perform the actions described above.
  Only 'yes' will be accepted to approve.

  Enter a value: yes

aws_s3_bucket.this: Importing... [id=example-tf-generate-config-root-123456789012]
aws_s3_bucket.this: Import complete [id=example-tf-generate-config-root-123456789012]

Apply complete! Resources: 1 imported, 0 added, 0 changed, 0 destroyed.

オプションが長いので覚えられない

そんな私に

import ブロックを記述した状態で、単純に terraform plan を実行するとオプションを付与したコマンドを出力してくれます。

╷
│ Error: Import block target does not exist
│
│   on imports.tf line 1:
│    1: import {
│
│ The target for the given import block does not exist. If you wish to automatically
│ generate config for this resource, use the -generate-config-out option within terraform
│ plan. Otherwise, make sure the target resource exists within your configuration. For
│ example:
│
│   terraform plan -generate-config-out=generated.tf

ファイルを上書きしてしまいそうで怖い

そんな私に

指定したtfファイルが既に存在する状態で実行するとエラー出力してくれます。

│ Error: Target generated file already exists
│
│ Terraform can only write generated config into a new file. Either choose a different
│ target location or move all existing configuration out of the target file, delete it and
│ try again.

書く場所がわからない

そんな私に

module 内に記述すると直下に書いてねとエラー出力してくれます。

╷
│ Error: Invalid import configuration
│
│   on _modules/mod1/mod1.tf line 9:
│    9: import {
│
│ An import block was detected in "module.mod1". Import blocks are only allowed
│ in the root module.

module へ import する場合

既に module 内にリソース定義があるので、 -generate-config-out オプションを付けても、ファイルへの出力は無いです。

オプションの話からは外れますが、import ブロックでは module への import も可能です。

二点制約があります。

  • module 内にリソース定義されている必要がある
    • terraform init 後、つまり、state に含まれている状態である必要がある
  • import ブロックは module 内ではなく root (直下) に記述する必要がある

ネストしたmoduleにも対応しています。 to の指定は以下の様に、 module.{module名} を連ねていくだけです。

# module への import
import {
    id = "example-tf-generate-config-mod1-123456789012"
    to = module.mod1.aws_s3_bucket.this
}

# mod1のmodule mod2 への import
import {
    id = "example-tf-generate-config-mod2-123456789012"
    to = module.mod1.module.mod2.aws_s3_bucket.this
}

# mod1のmodule mod2のmodule mod3 への import
import {
    id = "example-tf-generate-config-mod3-123456789012"
    to = module.mod1.module.mod2.module.mod3.aws_s3_bucket.this
}

制限事項

公式ドキュメントにも記載があります。

現時点の制限事項として、競合する属性を持つ場合に出力されたファイルをそのまま利用できない事が発生します。

今回例として使用している aws_s3_bucket では、 bucket_prefix を使用して作成したリソースを取り込もうとした所、発生しました。

% terraform plan -generate-config-out=generated.tf
aws_s3_bucket.this: Preparing import... [id=example-tf-generate-config-prefix-20231014024553631000000001]
aws_s3_bucket.this: Refreshing state... [id=example-tf-generate-config-prefix-20231014024553631000000001]

Planning failed. Terraform encountered an error while generating this plan.

╷
│ Warning: Config generation is experimental
│
│ Generating configuration during import is currently experimental, and the generated
│ configuration format may change in future versions.
╵
╷
│ Error: Conflicting configuration arguments
│
│   with aws_s3_bucket.this,
│   on generated.tf line 1:
│   (source code not available)
│
│ "bucket": conflicts with bucket_prefix
╵
╷
│ Error: Conflicting configuration arguments
│
│   with aws_s3_bucket.this,
│   on generated.tf line 2:
│   (source code not available)
│
│ "bucket_prefix": conflicts with bucket

出力されたファイルを見ると、 conflict の制限がある bucketbucket_prefix の両方が指定されています。

この様な状態となった場合は、いずれかの属性を削除する事で取り込みできるようになります。

% cat generated.tf
# __generated__ by Terraform
# Please review these resources and move them into your main configuration files.

# __generated__ by Terraform
resource "aws_s3_bucket" "this" {
  bucket              = "example-tf-generate-config-prefix-20231014024553631000000001"
  bucket_prefix       = "example-tf-generate-config-prefix-"
  force_destroy       = null
  object_lock_enabled = false
  tags                = {}
  tags_all            = {}
}

まとめ

これまでimportする際にリソース定義の記述を試行錯誤していた所、terraform 単体で完結できるのは素晴らしいです。

既にあるリソースと同じ定義で新たに作成したいといった場合にも活躍しそうです。
New Relic Nginx integration のログ転送

Datadog でログの日時がずれる問題(Datadog Nginx error.log の timestamp を考慮する)があった際に、 New Relic ではどうなるのだろうかとふと思いました。


結論

  • Nginx integration の標準インストールで特に問題無し

これで終わってしまうのでインストールの際に気付いた点を連連とメモ。

前提

# /etc/newrelic-infra/logging.d/nginx-log.yml.example
logs:
  - name: nginx-access
    file: /var/log/nginx/access.log
    attributes:
      logtype: nginx
  - name: nginx-error
    file: /var/log/nginx/error.log
    attributes:
      logtype: nginx-error

ログ取得結果

access.log、error.log の timestamp がいずれも JST のログ時間と合致します。

留意点

公式ドキュメントのあちらこちらに書かれていますが、二重にログが送信されることがあります。

既存のログ転送ソリューションがあり、コンテキストで自動ログを使用するようにエージェントを更新している場合は、手動ログ転送を必ず無効にしてください。それ以外の場合、アプリは二重のログ行を送信します。アカウントによっては、これにより二重請求が発生する可能性があります。

設定ファイル内記述を重複記述できるため、 Infrastructure agent のみ使用している場合でもこの事象は発生しえます。

既に Nginx が導入済みの環境に Infrastructure Agent をインストールすると、自動検出して Nginx Integration を併せてインストールすることができます。 この際に Log 設定も追加されます。

We've detected additional monitoring that can be configured by installing the following:
  NGINX Integration

? Continue installing?  Yes

==> Installing NGINX Integration
nginx: the configuration file /etc/nginx/nginx.conf syntax is ok
nginx: configuration file /etc/nginx/nginx.conf test is successful

[OK] All checks passed. Installing Nginx Integration...

✔ Installing NGINX Integration
   Installed

  New Relic installation complete

  --------------------
  Installation Summary

  ✔  Infrastructure Agent  (installed)
  ✔  Logs Integration  (installed)
  ✔  NGINX Integration  (installed)

  View your data at the link below:
  ⮕  https://onenr.io/XXXXXXXXXX

  View your logs at the link below:
  ⮕  https://onenr.io/XXXXXXXXXX

  --------------------

その後公式の Nginx Integration インストール手順に沿って のインストールを進めると、logging.d/nginx-log.yml を作成する記載があります。

6. 自動NGINXアクセス、エラーログ解析および転送を有効にするには、nginx-log.yml.exampleファイルをnginx-log.ymlにコピー(または名前変更)します。エージェントを再起動する必要はありません。

ここで作成を行ってしまうと、Nginx のログに対する設定が二箇所に記載されることになり、ログが二重で送信されます。

なお、自動検出によるログの設定は /etc/newrelic-infra/logging.d/discovered.yml に記述されています。

ログ解析ルール

Built-in の解析ルールの詳細は公式ドキュメントに記載されています。

標準フォーマットに沿った内容となっているため、 属性の不足がある場合や、ログフォーマットの変更を行っている場合など、 合致しない場合は独自の解析ルールを作成する必要があります。

例として標準の Nginx の解析ルールだと http_x_forwarded_for が含まれていません。

  • Nginx 標準の log_format
    log_format  main  '$remote_addr - $remote_user [$time_local] "$request" '
                      '$status $body_bytes_sent "$http_referer" '
                      '"$http_user_agent" "$http_x_forwarded_for"';
  • logtype = 'nginx' parsing rule
%{IPORHOST:clientip} %{USER:ident} %{USER:auth} \[%{HTTPDATE:timestamp}\] "(?:%{WORD:verb} %{NOTSPACE:request}(?: HTTP/%{NUMBER:httpversion})?|%{DATA:rawrequest})" %{NUMBER:response} (?:%{NUMBER:bytes}|-) %{QS:referrer} %{QS:agent}

ログ解析し属性化することでグラフ作成なども容易に行えるようになります。

SELECT count(*) FROM Log WHERE `logtype` = 'nginx' FACET response SINCE 1 hour ago TIMESERIES

Datadog Nginx error.log の timestamp を考慮する

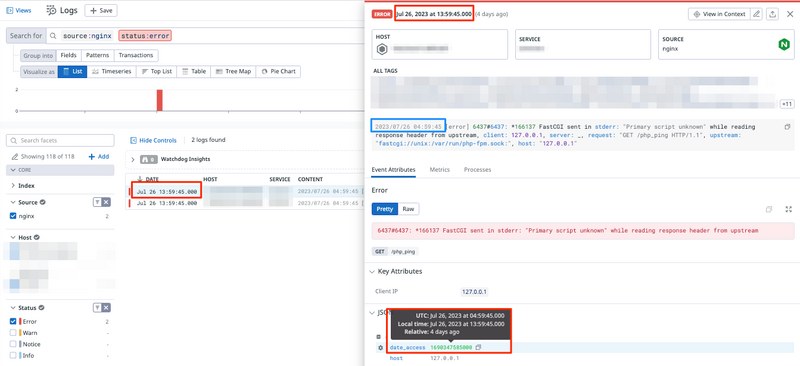
Datadog の Nginx Integration を利用してログを収集した際に error.log が UTC で取り込まれるため対処します。


前提

  • 収集対象のサーバの timezone は JST
  • 収集設定はデフォルト

      logs:
        - type: file
          path: /var/log/nginx/access.log
          service: nginx
          source: nginx
    
        - type: file
          path: /var/log/nginx/error.log
          service: nginx
          source: nginx
    
  • source: nginx を指定しているため Datadog 提供のパイプライン経由となる

  • Datadog UI 上の Time zone は JST (Detect by browser (UTC+09:00))

事象

OK: access.log は JST で取り込まれる

access.log の出力形式は dd/MMM/yyyy:HH:mm:ss Z となっており、タイムゾーン指定があります。

この場合は特に問題は有りません。

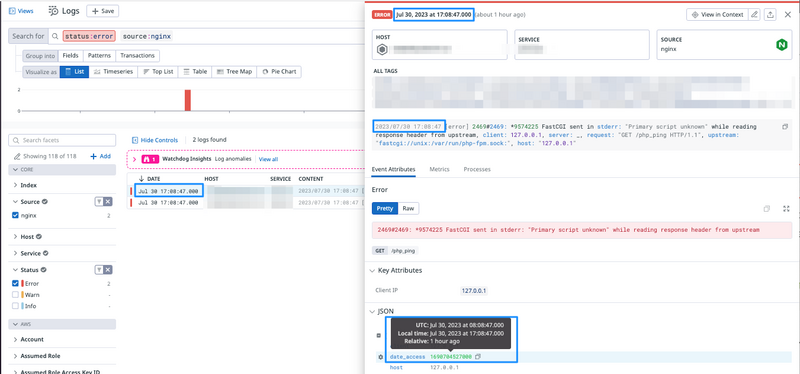
NG: error.log が UTC で取り込まれる

error.log の出力形式は yyyy/MM/dd HH:mm:ss となっており、タイムゾーン指定がありません。

タイムゾーン未指定のため Datadog は UTC として取り込みます。

結果、実際のログ出力日時(JST)に更に +09:00 した日時での扱いとなります。

Live Tail で取り込まれているのは確認できるが、未来日なので Search で表示できないという事が起こります。 (9時間後に見れるようになります)

対処

対処方法としては二通りになると思います。

  • a) ログ出力にタイムゾーンを含める
  • b) Datadog Logs Pipeline で処理する

今回の Nginx では error.log の書式変更に対応していませんので、 a) の手法は取れません。

そのため Pipeline で処理します。

Nginx Integration pipeline (確認)

デフォルトで用意されている Integration pipeline は変更不可です。有効・無効と複製(Clone)は可能です。

タイムスタンプ周りでどのような処理が行われているのか確認します。

(1) Grok Parser: Parsing Nginx logs

タイムスタンプを data_access 属性に割り当てています。

error.format %{date("yyyy/MM/dd HH:mm:ss"):date_access} \[%{word:level}\] %{data:error.message}(, %{data::keyvalue(": ",",")})?

(6) Date Remapper: Define `date_access` as the official date of the log

date_access 属性をログタイムスタンプとして定義しています。

新規 Pipeline の追加

Integration pipeline を clone して編集する事もできますが、Datadog側仕様変更等で更新される可能性があるかもしれないため、新たに Pipeline を追加します。

Processor は Integration pipeline の processor 内容を模しており、 タイムスタンプ関連の processor のみに絞り、変更箇所は date matcher に timezone を追加しているのみです。

  • (filter) 条件に error.log を追加し、 nginx の error.log のみを対象としています
  • (1) Grok Parser で timezone を明示指定("Asia/Tokyo" 部分)したタイムスタンプに変換し、data_access 属性に割り当てます。

      error.format %{date("yyyy/MM/dd HH:mm:ss", "Asia/Tokyo"):date_access} \[%{word:level}\] %{data:error.message}(, %{data::keyvalue(": ",",")})?
    
  • (2) Date Remapper で date_access 属性をログタイムスタンプとして定義します

結果

error.log についても access.log 同様、JST で扱われる事が確認できます。

まとめ

  • Datadog Logs はログのタイムスタンプ形式にタイムゾーン指定が無い場合、 UTC で取り込まれます
  • source: 指定により事前定義された Integration Pipeline を経由します
  • Logs Pipeline で処理する場合は、 Grok の date matcher でタイムゾーンを指定して解析し、Log date remapper でタイムスタンプを定義することでタイムゾーン指定が行なえます

AWS IAM “The policy failed legacy parsing” の謎

小ネタです。

AWS IAM Policy を作成する際に以下の様なエラーが発生することがあります。

An error occurred (MalformedPolicyDocument) when calling the CreatePolicy operation: The policy failed legacy parsing

このエラー自体は汎用的なメッセージであり、発生原因はいくつか存在するようです。
JSONとしては正しいが、IAM Policy の仕様上許可されない場合に出力されるようです。

少し謎な仕様があったのでメモ。


基本

AWSマネジメントコンソールの Policy editor で表示される雛形です。

{
    "Version": "2012-10-17",
    "Statement": [
        {
            "Sid": "Statement1",
            "Effect": "Allow",
            "Action": [],
            "Resource": []
        }
    ]
}

文法に関する諸々は公式ドキュメントにまとまっています。

IAM JSON ポリシーリファレンス - AWS Identity and Access Management

先頭は { で始まる必要があります。

よくある話です。

空白や改行が先頭にあるとエラーになります。
Policy editor 上では少し詳しいメッセージ出力となり、作成時に “JSON strings must not have leading spaces” が出力されます。

作成時に と書いたのは、Validation 時点で判明せず、 “Next” ボタン押下時に出力されるためです。
CLISDK での実行では “The policy failed legacy parsing” としか教えてくれません。 access-analyzer での ValidatePolicy も通ります。

Statement は配列 である必要があります。

本題です。Statement 要素は 配列 です。

"Statement": [{...},{...},{...}]

だがしかし、1オブジェクトでの作成は許可されます。

“Statement” が1つで済むポリシーは、値部分が配列である必要はなく、オブジェクトでも作成できます。

尚、この記述方法は公式ドキュメント上でも普通に使われています。

だがしかしだがしかし、オブジェクトの場合は Version 要素が先頭である必要があります。

本題の本題です。

公式ドキュメント上の "ポリシーの文法に関する注意事項" に要素順は問わないとあるのですが、通りません。

+ cat policy.object.error.json
{
  "Statement": {
    "Effect": "Allow",
    "Action": "s3:ListBucket",
    "Resource": "arn:aws:s3:::example_bucket"
  },
  "Version": "2012-10-17"
}
+ aws iam create-policy --policy-name example-policy.object.error --policy-document file://policy.object.error.json

An error occurred (MalformedPolicyDocument) when calling the CreatePolicy operation: The policy failed legacy parsing

Policy editor での”Next”ボタン押下は通り、その後の “Create policy” ボタン押下後にエラーになります。

尚、 “Statement” が配列であれば通ります。

まとめ

余計なトラブルの回避のため Statement 要素は配列, Version は先頭 にしておくのが良さそうです。

AWS IAM Identity Center (SSO) External Account での CLI 利用

AWS IAM Identity Center (旧 AWS SSO) で AWS CLI を利用する方法です。


Organizations 配下

Organizations 配下 AWS アカウントであれば、ポータル上の “Command line or programmatic access” を利用して AWS CLI で使用可能な認証情報を取得できます。

AWS CLI から sso サブコマンドで認証情報の取得も行なえます。

Organizations 外 (事前設定)

本題の前に準備です。

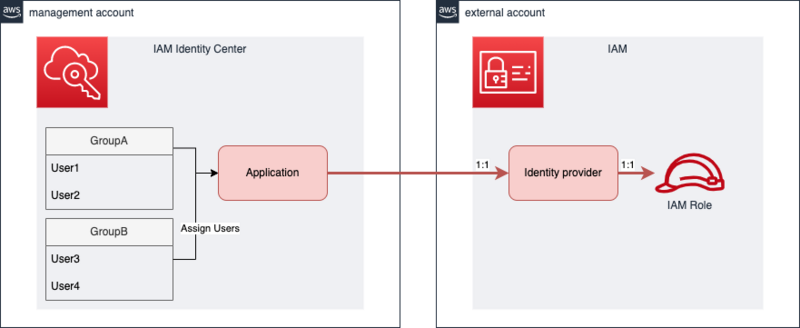
以下のように構成します。

External Account 設定 (管理アカウント側)

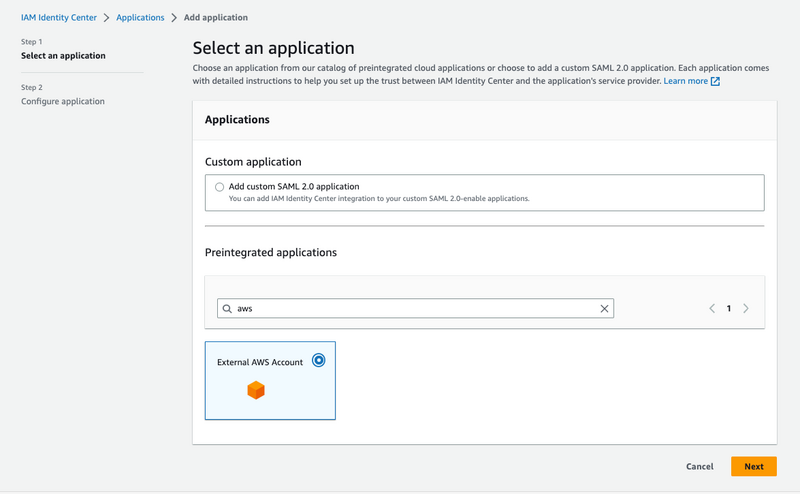
非Organizations AWS アカウントを IAM Identity Center へ割り当てます。

  • IAM Identity Center → Applications → External AWS Account

  • Configure application
    • デフォルト設定で動作します。
    • Display name, Description, Session duration を任意の値に変更
  • Assigned users
    • 利用するユーザを割り当て
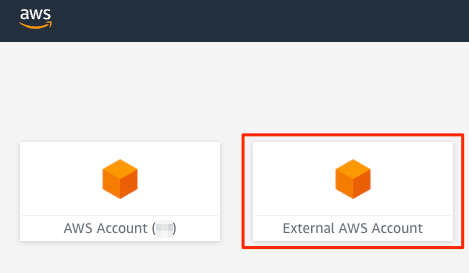
      • 割り当てたユーザでポータルを開くと追加した Application が表示されます

  • IAM Identity Center metadata” から SAML meta data (*.xml) をダウンロード

External Account 設定(非 Organizations AWS アカウント側)

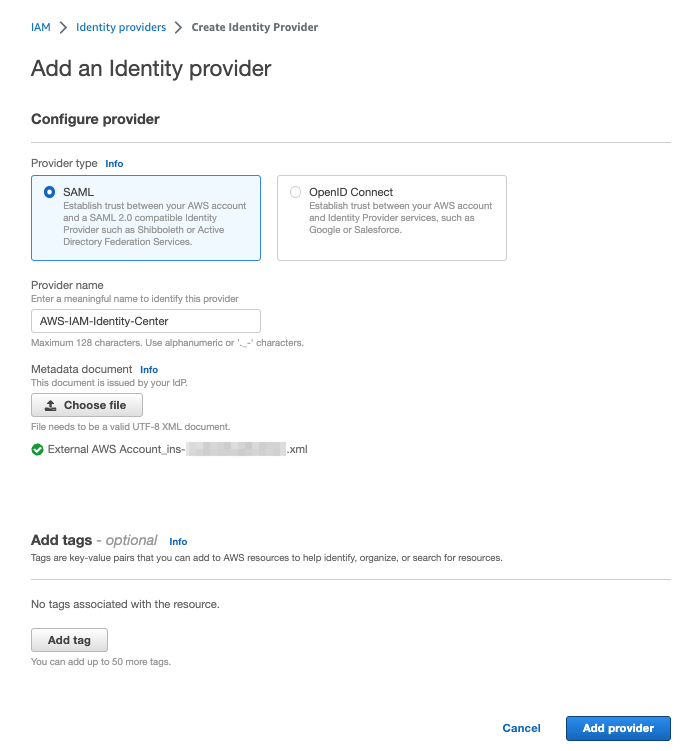
  • IAM → Identity providers → Add provider
    • ※ IAM Identity Center ではなく、 IAM
    • Provider type: SAML
    • Metadata document: ダウンロードした SAML meta data (*.xml)

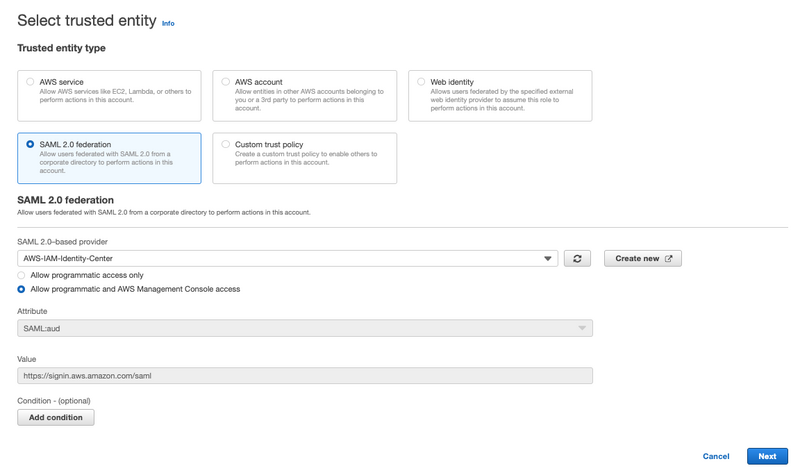
  • IAM → Role → Create role
    • Trusted entity type: SAML 2.0 federation
    • SAML 2.0–based provider: 作成した Identity provider を指定
    • Allow programmatic and AWS Management Console access: On

  • Add permissions
    • 必要に応じて権限を割り当て
  • Name, review, and create
    • Role name, Description を任意の値に変更

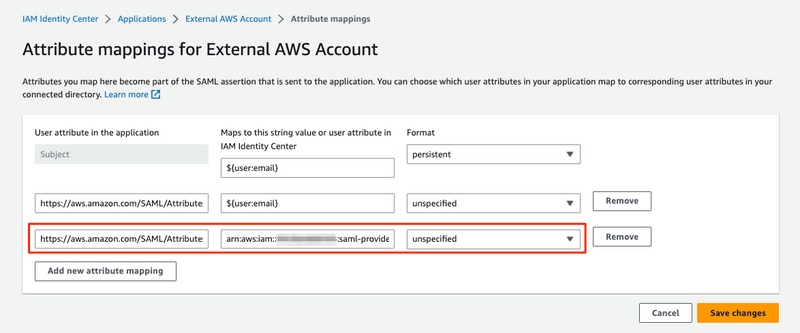
Attribute mappings 設定 (管理アカウント側)

  • IAM Identity Center → Applications → 作成済みの External AWS Account

接続確認(マネジメントコンソール)

割り当てたユーザでポータルを開き、作成した Application をクリックします。

設定が正しければ 非Organizations AWS アカウント へ作成した IAM Role でマネジメントコンソールが利用できます。

Organizations 外

本題です。

Organizations に属していない非Organizations AWS アカウントに対しても同等に利用したいです。

External Account のボタン押下は、マネジメントコンソールへの遷移です。

Organizations 配下とは異なり、“Command line or programmatic access” 出力はありません。

AWS CLI の sso サブコマンドで設定・接続を試みるもエラーとなり利用できません。

An error occurred (ForbiddenException) when calling the GetRoleCredentials operation: No access

残念ながら現時点ではAWS標準機能で簡単に利用できる仕組みにはなっていません。

AssumeRoleWithSAML を利用する

AssumeRoleWithSAML を利用して接続が可能です。

SAMLResponse を取得して認証を行うことになります。

手順に沿って実施してみると以下のようになります。

  • SAMLResponse 取得

  • AssumeRoleWithSAML
$ aws sts assume-role-with-saml \
--role-arn arn:aws:iam::123456789012:role/AWS-IAM-Identity-Center \
--principal-arn arn:aws:iam::123456789012:saml-provider/AWS-IAM-Identity-Center \
--saml-assertion file://samlresponse.log | awk -F:  '
  BEGIN { RS = "[,{}]" ; print "[PROFILENAME]"}
  /:/{ gsub(/"/, "", $2) }
  /AccessKeyId/{ print "aws_access_key_id = " $2 }
  /SecretAccessKey/{ print "aws_secret_access_key = " $2 }
  /SessionToken/{ print "aws_session_token = " $2 }
'

[PROFILENAME]
aws_access_key_id =  XXXXXXXXXXXXXXXXXXXX
aws_secret_access_key =  xxxxxxxxxxxxxxxxxxxxxxxxxxxxxxxxxxxxxxxx
aws_session_token =  ...

返却される Credential を使用して接続を行います。

SAMLResponse の取得を自動化

本当の本題です。

理屈はわかったのでブラウザの開発ツールから SAMLResponse を取得するという部分も自動的に行いたいです。

実施したい事は How to Implement a General Solution for Federated API/CLI Access Using SAML 2.0 | AWS Security Blog に記載の内容です。

この記事を元に実装されている OSS saml2aws を利用します。

saml2aws の設定例

環境

configure

saml2aws configure

saml2aws の README に記載がありますが、 Browser provider を利用する場合は playwright-go が必要になります。

login

# 初回 playwright-go を含める
# saml2aws login --download-browser-driver

saml2aws login

プロンプトで Username, Password を聞かれますが、特に入力せず Enter 押下で進めると、 Chromium が立ち上がるのでそこでも認証を行います。当方環境では Google Workspace のログインです。

認証プロセスが完了または失敗すると Chromium は自動終了します。 ユーザ割り当てが行われていない場合などで Chromium での認証が失敗した場合、 プロンプトは waiting … のままになります。

Using IdP Account default to access Browser https://d-XXXXXXXXXX.awsapps.com/start/#/saml/default/External AWS Account/ins-xxxxxxxxxxxxxxxx
To use saved password just hit enter.
? Username (hoge@example.com)
? Password

Authenticating as hoge@example.com ...
INFO[0006] opening browser                               URL="https://d-XXXXXXXXXX.awsapps.com/start/#/saml/default/External%20AWS%20Account/ins-xxxxxxxxxxxxxxxx" provider=browser
waiting ...
INFO[0035] clean up browser                              provider=browser
Selected role: arn:aws:iam::123456789012:role/AWS-IAM-Identity-Center
Requesting AWS credentials using SAML assertion.
Logged in as: arn:aws:sts::123456789012:assumed-role/AWS-IAM-Identity-Center/hoge@example.com

Your new access key pair has been stored in the AWS configuration.
Note that it will expire at 2023-06-24 00:00:00 +0900 JST
To use this credential, call the AWS CLI with the --profile option (e.g. aws --profile saml ec2 describe-instances).

~/.aws/credential[saml] プロファイルが作成されています。( configure でオプション指定している場合は指定したプロファイル名)

ここに取得した Credential 情報が設定されています。

確認

上記で設定したプロファイルを使用して AWS CLI を実行します。

% aws sts get-caller-identity --profile saml
{
    "UserId": "XXXXXXXXXXXXXXXXXXXXX:hoge@example.com",
    "Account": "123456789012",
    "Arn": "arn:aws:sts::123456789012:assumed-role/AWS-IAM-Identity-Center/hoge@example.com"
}
~ % aws s3 ls --profile saml
...

まとめ

External AWS Account でも Access Key の発行を行わず、一時的な認証情報を取得して利用できるのでセキュアに運用できそうです。

SAMLResponse の取得は saml2aws で行えます。 saml2aws で指定する provider に GoogleApps がありますが、こちらは IdP を Google Workspace にする場合に使用します。