vague memory

うろ覚えを無くしていこうともがき苦しむ人の備忘録

ansible pythonが無い場合の対処

Ubuntu 16.04.2 に対して ansible 実行しようとしたら python が見つからないよと怒られたのでメモ。

公式ドキュメントに記載があります。

python2 と python3 の共存問題のようです。


エラー内容と環境

  • エラー
fatal: [xxx.xxx.xxx.xxx]: FAILED! => {
    "changed": false,
    "failed": true,
    "module_stderr": "Shared connection to xxx.xxx.xxx.xxx closed.\r\n",
    "module_stdout": "/bin/sh: 1: /usr/bin/python: not found\r\n",
    "msg": "MODULE FAILURE",
    "rc": 0
}
  • 環境
$ cat /etc/os-release
NAME="Ubuntu"
VERSION="16.04.2 LTS (Xenial Xerus)"
ID=ubuntu
ID_LIKE=debian
PRETTY_NAME="Ubuntu 16.04.2 LTS"
VERSION_ID="16.04"
HOME_URL="http://www.ubuntu.com/"
SUPPORT_URL="http://help.ubuntu.com/"
BUG_REPORT_URL="http://bugs.launchpad.net/ubuntu/"
VERSION_CODENAME=xenial
UBUNTU_CODENAME=xenial
$ which python
$ which python3
/usr/bin/python3
$ ls -1 /usr/bin/python*
/usr/bin/python3
/usr/bin/python3.5
/usr/bin/python3.5m
/usr/bin/python3-jsondiff
/usr/bin/python3-jsonpatch
/usr/bin/python3-jsonpointer
/usr/bin/python3m

python2 で動かす

python2 をインストールします。 ansible で導入する場合は raw モジュールを使用します。

ansible コマンド例

ansible xxx.xxx.xxx.xxx --sudo -m raw -a "apt-get --yes install python python-simplejson" -i hosts
  • 導入後
$ which python
/usr/bin/python
$ python -V
Python 2.7.12

playbook 例

ansible-playbook で導入する場合は、 gather_facts: no の指定が必要です。

- hosts: xxxxxx
  become: yes
  gather_facts: no
  pre_tasks:
    - name: 'install python2'
      raw: apt-get --yes install python python-simplejson

python3 で動かす(Ansible 2.2以上)

※ 現時点ではプレビューとのことです。

インベントリで ansible_python_interpreter に python3 を指定します。

xxx.xxx.xxx.xxx ansible_python_interpreter=/usr/bin/python3

/usr/bin/python だけが無い場合

/usr/bin/python2 は有るが /usr/bin/python が無い場合などは、以下いずれかで対応できるかと思います。

Ansible 2.2以上

インベントリで ansible_python_interpreter に python2 を指定します。

xxx.xxx.xxx.xxx ansible_python_interpreter=/usr/bin/python2

Ansible 2.2未満

きちんと検証はしていませんが、シンボリックリンクで動作はするようです。

ln -s /usr/bin/python2 /usr/bin/python

参考URL

DynamoDB Auto Scaling 関連リソース

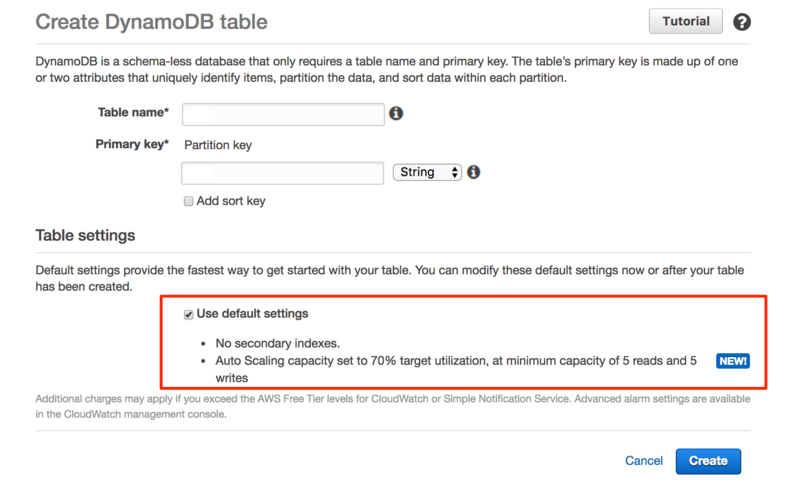
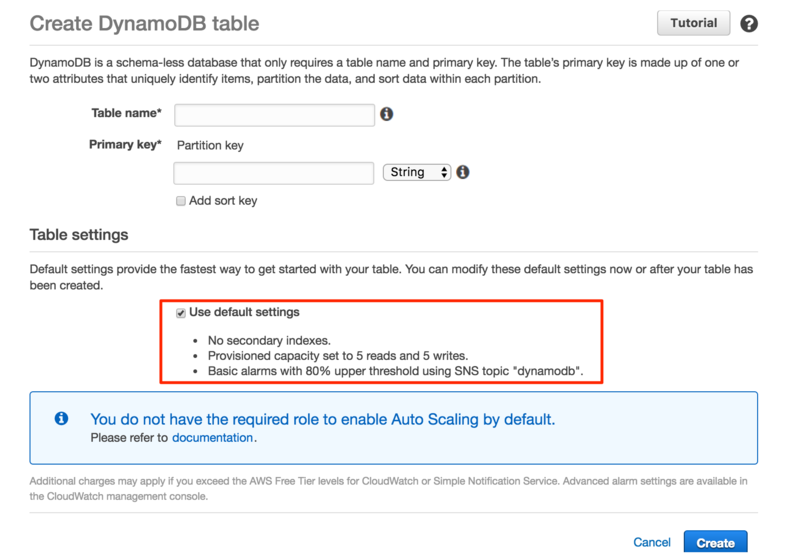
AWSマネジメントコンソールで新規テーブルを作成すると、デフォルトで Auto Scaling が有効な状態で作成されるようになっているそうです。(変わっていないAWSアカウントもありましたので、既存環境はIAM Role等々を用意しないと切り替わらないのかもしれません。)

  • デフォルトで Auto Scaling 有効

f:id:htnosm:20170714184101p:plain

  • デフォルトで Auto Scaling 無効(既存)

f:id:htnosm:20170714184102p:plain

以下、既存テーブルへ適用しようとした際に調査した内容です。

DynamoDB Auto Scaling 設定値

設定できる最小/最大値は以下の通りです。

  • Provisioned capacity
    • Auto Scaling を有効化した場合は設定不可
  • Auto Scaling
    • Target utilization (%)
      • 20 〜 80
    • Minimum provisioned capacity
      • 1 〜 5
    • Maximum provisioned capacity
      • 5 〜 10000
    • IAM Role
      • AWSマネジメントコンソール上でのデフォルトは DynamoDBAutoscaleRole

DynamoDB Auto Scaling 有効化で作成されるリソース

IAM Role

規定では DynamoDBAutoscaleRole です。 後述のポリシー(DynamoDBAutoscalePolicy)、Trust Relationshipが付与されます。

DynamoDBAutoscalePolicy

"Document": {
    "Version": "2012-10-17",
    "Statement": [
        {
            "Action": [
                "dynamodb:DescribeTable",
                "dynamodb:UpdateTable",
                "cloudwatch:PutMetricAlarm",
                "cloudwatch:DescribeAlarms",
                "cloudwatch:GetMetricStatistics",
                "cloudwatch:SetAlarmState",
                "cloudwatch:DeleteAlarms"
            ],
            "Resource": "*",
            "Effect": "Allow"
        }
    ]
}

Trust Relationship

{
  "Version": "2012-10-17",
  "Statement": [
    {
      "Sid": "",
      "Effect": "Allow",
      "Principal": {
        "Service": "application-autoscaling.amazonaws.com"
      },
      "Action": "sts:AssumeRole"
    }
  ]
}

Application Auto Scaling

スケーリングは DynamoDB での管理ではなく、 Application Auto Scaling での管理となります。

ScalableTarget

テーブル単位で ReadCapacityUnits と WriteCapacityUnits がそれぞれ作成されます。

"ScalableTargets": [
    {
        "ScalableDimension": "dynamodb:table:ReadCapacityUnits",
        "ResourceId": "table/dummy-table",
        "RoleARN": "arn:aws:iam::999999999999:role/service-role/DynamoDBAutoscaleRole",
        "CreationTime": 9999999999.99,
        "MinCapacity": 1,
        "ServiceNamespace": "dynamodb",
        "MaxCapacity": 5
    },
    {
        "ScalableDimension": "dynamodb:table:WriteCapacityUnits",
        "ResourceId": "table/dummy-table",
        "RoleARN": "arn:aws:iam::999999999999:role/service-role/DynamoDBAutoscaleRole",
        "CreationTime": 9999999999.99,
        "MinCapacity": 1,
        "ServiceNamespace": "dynamodb",
        "MaxCapacity": 5
    }
]

ScalingPolicy

テーブル単位で ReadCapacityUnits と WriteCapacityUnits がそれぞれ作成されます。
加えて、スケーリング判断用の CloudWatch Alarm が4つ付随します。

"ScalingPolicies": [
    {
        "PolicyName": "DynamoDBReadCapacityUtilization:table/dummy-table",
        "ScalableDimension": "dynamodb:table:ReadCapacityUnits",
        "ResourceId": "table/dummy-table",
        "CreationTime": 9999999999.999,
        "PolicyARN": "arn:aws:autoscaling:ap-northeast-1:999999999999:scalingPolicy:xxxxxxxx-xxxx-xxxx-xxxx-xxxxxxxxxxxx:resource/dynamodb/table/dummy-table:policyName/DynamoDBReadCapacityUtilization:table/dummy-table",
        "PolicyType": "TargetTrackingScaling",
        "TargetTrackingScalingPolicyConfiguration": {
            "TargetValue": 70.0,
            "PredefinedMetricSpecification": {
                "PredefinedMetricType": "DynamoDBReadCapacityUtilization"
            }
        },
        "Alarms": [
            {
                "AlarmName": "TargetTracking-table/dummy-table-AlarmHigh-xxxxxxxx-xxxx-xxxx-xxxx-xxxxxxxxxxxx",
                "AlarmARN": "arn:aws:cloudwatch:ap-northeast-1:999999999999:alarm:TargetTracking-table/dummy-table-AlarmHigh-xxxxxxxx-xxxx-xxxx-xxxx-xxxxxxxxxxxx"
            },
            {
                "AlarmName": "TargetTracking-table/dummy-table-AlarmLow-xxxxxxxx-xxxx-xxxx-xxxx-xxxxxxxxxxxx",
                "AlarmARN": "arn:aws:cloudwatch:ap-northeast-1:999999999999:alarm:TargetTracking-table/dummy-table-AlarmLow-xxxxxxxx-xxxx-xxxx-xxxx-xxxxxxxxxxxx"
            },
            {
                "AlarmName": "TargetTracking-table/dummy-table-ProvisionedCapacityHigh-xxxxxxxx-xxxx-xxxx-xxxx-xxxxxxxxxxxx",
                "AlarmARN": "arn:aws:cloudwatch:ap-northeast-1:999999999999:alarm:TargetTracking-table/dummy-table-ProvisionedCapacityHigh-xxxxxxxx-xxxx-xxxx-xxxx-xxxxxxxxxxxx"
            },
            {
                "AlarmName": "TargetTracking-table/dummy-table-ProvisionedCapacityLow-xxxxxxxx-xxxx-xxxx-xxxx-xxxxxxxxxxxx",
                "AlarmARN": "arn:aws:cloudwatch:ap-northeast-1:999999999999:alarm:TargetTracking-table/dummy-table-ProvisionedCapacityLow-xxxxxxxx-xxxx-xxxx-xxxx-xxxxxxxxxxxx"
            }
        ],
        "ServiceNamespace": "dynamodb"
    },
・・・略
]

CloudWatch Alarm

AlarmHigh のみ 5分間、その他は 15分間での設定になっています。 Description に DO NOT EDIT OR DELETE と有り、閾値時間変更は推奨されないようです。

  • AlarmLow
  • AlarmHigh
  • ProvisionedCapacityLow
  • ProvisionedCapacityHigh

AWS CLI チュートリアル

CLI を使用したチュートリアルが公開されていますので、一通り実行してみるとイメージを掴みやすいかと思います。

Using the AWS CLI to Manage DynamoDB Auto Scaling - Amazon DynamoDB

チュートリアル実施時の注意点としては下記のような感じでしょうか。

DynamoDB Auto Scaling 設定は、aws dynamodb ではなく、aws application-autoscaling です。

マネジメントコンソールから作成すると、ScaleOutCooldown/ScaleInCooldown はデフォルト0で作成されます。 マネジメントコンソール上からの変更方法は現時点では提供されていないようです。

Mackerel 自動復旧させないアラートは手動復旧しないとその後のアラートが通知されないことがあるので気を付ける

経緯

Mackerel のチェック監視に prevent_alert_auto_close オプションが追加されました。

自動復旧しないアラート ということで、ログ監視に利用できるかと考えたのですが、思っていた内容とは少し異なる動きでした。

やりたかったこと

  • check-log でのアラート発生時の後に通知される 復旧通知(OK)を無くしたい

f:id:htnosm:20170614214813p:plain

ログの監視なのでアラート通知されればよく、復旧通知は不要と思っています。

実際

test_1.log を prevent_alert_auto_close = true として、2つのログファイルに同一タイミングで同一メッセージを出力して確認します。

[plugin.checks.test_1_log]
command = '''
  check-log \
    --file /var/log/test_1.log \
    --pattern 'ERROR' \
    --warning-over 0 \
    --critical-over 0 \
    --return
'''
prevent_alert_auto_close = true

[plugin.checks.test_2_log]
command = '''
  check-log \
    --file /var/log/test_2.log \
    --pattern 'ERROR' \
    --warning-over 0 \
    --critical-over 0 \
    --return
'''

アラート1回目

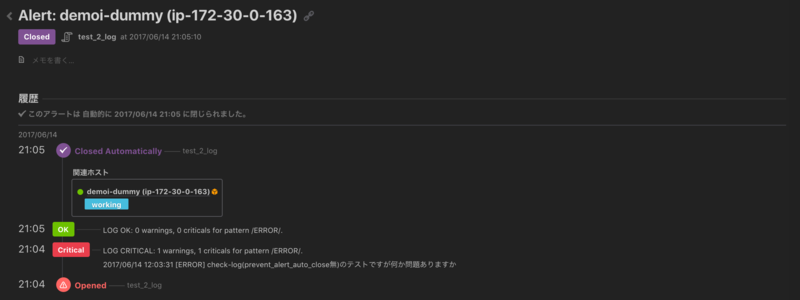
test_1 は復旧通知が無いため、要望を満たせたように見えます。

  • test_1 (Auto Close 無し)

f:id:htnosm:20170614214814p:plain

  • test_2 (Auto Close)

f:id:htnosm:20170614214815p:plain

  • 通知結果

f:id:htnosm:20170614214816p:plain

アラート2回目

test_1 はアラートが発生しません。

  • 通知結果

f:id:htnosm:20170614214817p:plain

アラート3回目

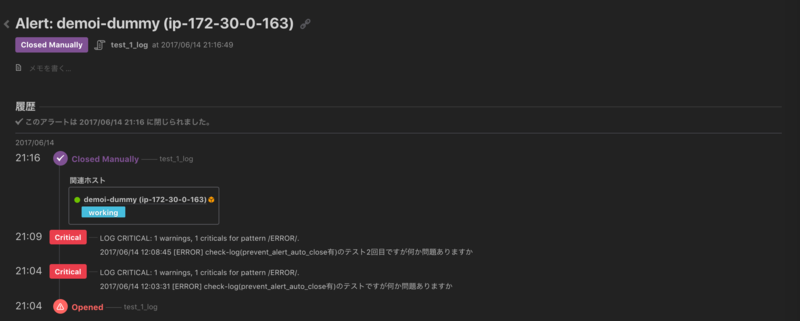
test_1 を手動で復旧してから、再度ログ出力を行います。 f:id:htnosm:20170614214818p:plain

  • 通知結果

f:id:htnosm:20170614214819p:plain

結論

アラートの復旧を行った状態でないと、次回以降のチェック時にアラート状態であっても通知は行われません。

チェック監視のアラート通知
アラートが発生した場合と、アラート発生後にアラートの状態が変更した場合にアラートの通知が行われます。「アラートの状態が変更した場合」には以下の2つの場合があります。

ステータスが変更になった場合

ex. CRITICAL -> WARNING, WARNING -> CRITICAL, CRITICAL -> OK

ステータスがOKになった場合も含みます

チェックプラグインが送信してくるメッセージの内容が変わった場合

ということで、 prevent_alert_auto_close オプション はログ監視(特にエラー時にのみ出力されるログ)には向かないようです。

復旧通知の無効化や、某abbixの 障害イベントを継続して生成 のような機能の実装を待ちます。

Datadog 通知先振分あれやこれや

Datadog Monitor 通知先の振り分け設定パターンです。

f:id:htnosm:20170611174402j:plain

前提

通知先のインテグレーション設定を済ませておきます。 今回は Slack インテグレーションで試してます。

f:id:htnosm:20170611174403p:plain

ちなみに今回は通知先しか設定していませんが、同様に通知する本文も振り分け先により変更できます。

基本形

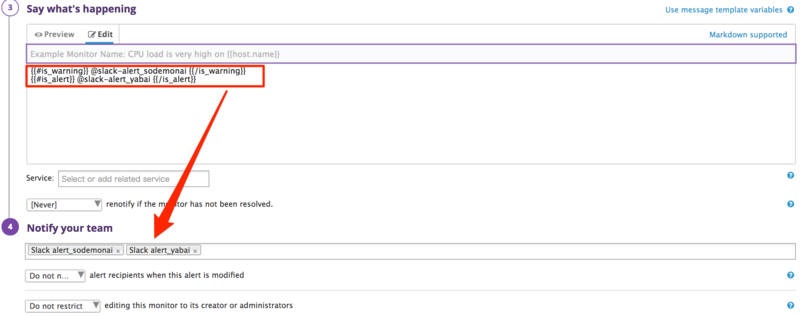
Monitor設定画面の Notify your team から定義済みの通知設定を選択することで、本文(Say what’s happening) に自動的に入力されます。 複数設定も可能です。

f:id:htnosm:20170611174404p:plain

メールアドレス通知については定義済み通知先の他に、直接指定も可能です。

(例えばuser@example.comなら@user@example.comと記述)。

アラートレベルで振分

テンプレート変数を利用し、Alert/Warning/Recoveryなどで通知先を振り分けます。

本文に以下のように記載することで、正しい値であればNotify your teamが自動入力されます。

f:id:htnosm:20170611174405p:plain

タグの値で振分

テンプレート変数の亜種です。 match変数を利用し、指定したタグの値により通知先を振り分けます。

f:id:htnosm:20170611174406p:plain

{{#is_match “タグ変数” “文字列”}}
ここに、一致した場合に表示する本文を記述します。
{{/is_match}}

ドキュメントに記載が無いですが、 exact_match 変数が存在します。 使い方は match と同じです。

{{#is_exact_match “タグ変数” “文字列”}}
ここに、一致した場合に表示する本文を記述します。
{{/is_exact_match}}

match と exact_match の違いは、 match = 中間一致、exact_match = 完全一致 のようです。

タグで指定

ドキュメントに記載はありません。明確に駄目とも記載は無いので今の所は利用可能なようです。
通知先を設定する @〜 部分にタグを埋め込みます。
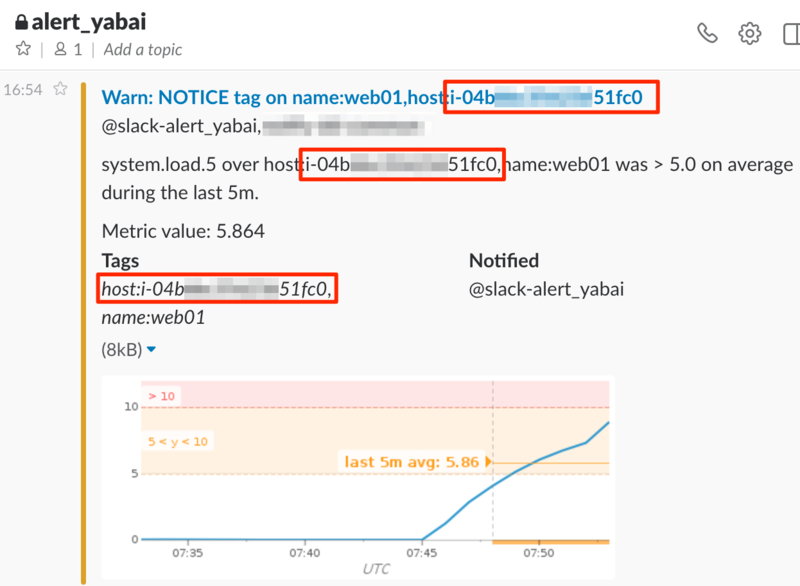
Monitor画面上は通知先が決定されていないため、Notify your teamには値が入りません。 また、同一タグ名で複数値がある場合はカンマ区切りで設定され、両方へ通知が成されるようです。

f:id:htnosm:20170611174407p:plain

例として、 対象に slack_channel_name というタグを付与しています。

slack_channel_name:alert_yabai   i-04bxxxxxxxxx51fc0
slack_channel_name:alert_sodemonai  i-093xxxxxxxxx1b20d
  • alert_sodemonai

f:id:htnosm:20170611174408p:plain

  • alert_yabai

f:id:htnosm:20170611174409p:plain

Terraform Datadog Provider の Import と tf 変換

Terraform Datadog Provider で利用できるリソースの内、Downtime,Monitor,User がインポートに対応しています。

Downtime,MonitorはそれぞれのID、UserはDatadogアカウントのメールアドレスを指定することでインポートが可能です。

# Downtime
terraform import datadog_downtime."リソース名" "ダウンタイムID"
# Monitor
terraform import datadog_monitor."リソース名" "モニターID"
# User
terraform import datadog_user."リソース名" "ユーザメールアドレス"

使用する ID などはそれぞれ以下のページで確認できます。

インポート例

$ terraform import datadog_monitor.monitor1 XXXX773
datadog_monitor.monitor1: Importing from ID "XXXX773"...
datadog_monitor.monitor1: Import complete!
  Imported datadog_monitor (ID: XXXX773)
datadog_monitor.monitor1: Refreshing state... (ID: XXXX773)

Import success! The resources imported are shown above. These are
now in your Terraform state. Import does not currently generate
configuration, so you must do this next. If you do not create configuration
for the above resources, then the next `terraform plan` will mark
them for destruction.

存在しないIDを指定するとエラーになります。

$ terraform import datadog_monitor.not_exists_monitor XXXX779
datadog_monitor.not_exists_monitor: Importing from ID "XXXX779"...
Error importing: 1 error(s) occurred:

* datadog_monitor.not_exists_monitor (import id: XXXX779): import datadog_monitor.not_exists_monitor (id: XXXX779): API error 404 Not Found: {"errors":["Monitor not found"]}

インポート後の状態

tfファイルは生成されないため、そのまま実行すると削除(destroy)となります。
以下はいくつかのリソースをインポートした後に plan を実行した例です。

$ terraform plan
Refreshing Terraform state in-memory prior to plan...
The refreshed state will be used to calculate this plan, but will not be
persisted to local or remote state storage.

datadog_downtime.daily_mute: Refreshing state... (ID: XXXXXX759)
datadog_user.new_user: Refreshing state... (ID: new@example.com)
datadog_downtime.cpu_exceeds: Refreshing state... (ID: XXXXXX289)
datadog_monitor.datadog-agentup: Refreshing state... (ID: XXXX789)
datadog_monitor.clock_in_sync: Refreshing state... (ID: XXXX121)
The Terraform execution plan has been generated and is shown below.
Resources are shown in alphabetical order for quick scanning. Green resources
will be created (or destroyed and then created if an existing resource
exists), yellow resources are being changed in-place, and red resources
will be destroyed. Cyan entries are data sources to be read.

Note: You didn't specify an "-out" parameter to save this plan, so when
"apply" is called, Terraform can't guarantee this is what will execute.

- datadog_downtime.cpu_exceeds

- datadog_downtime.daily_mute

- datadog_monitor.clock_in_sync

- datadog_monitor.datadog-agentup

- datadog_user.new_user


Plan: 0 to add, 0 to change, 5 to destroy.

tfstate から tf ファイルを生成する

tfファイルを一から書くのは骨が折れるのでスクリプト化してみました。tfファイル生成後に plan を実行すると差分が無くなる事が確認できます。

# 変換用スクリプトをダウンロード
$ wget https://gist.github.com/htnosm/c617ea274e5daf690f19ebe1fc0176f7/raw/b9dcb03417890b9493115b285f1ecd3c148880d0/tf-dd-prov-imp2tf.py
# 変換実行
$ ./tf-dd-prov-imp2tf.py
# downtime.tf、monitor.tf、user.tfが生成される
$ ls -1 *.tf
downtime.tf
main.tf
monitor.tf
user.tf
# plan 確認
$ terraform plan
Refreshing Terraform state in-memory prior to plan...
The refreshed state will be used to calculate this plan, but will not be
persisted to local or remote state storage.

datadog_downtime.cpu_exceeds: Refreshing state... (ID: XXXXXX289)
datadog_user.new_user: Refreshing state... (ID: new@example.com)
datadog_downtime.daily_mute: Refreshing state... (ID: XXXXXX759)
datadog_monitor.datadog-agentup: Refreshing state... (ID: XXXX789)
datadog_monitor.clock_in_sync: Refreshing state... (ID: XXXX121)
No changes. Infrastructure is up-to-date.

This means that Terraform did not detect any differences between your
configuration and real physical resources that exist. As a result, Terraform
doesn't need to do anything.
$
  • tf-dd-prov-imp2tf.py

Convert tfstate to tf for datadog_monitor on Terra …

ドキュメントとの差異等

変換を試した際に公式ドキュメントと実際の設定値での差分や、記載されていない仕様があったので残しておきます。

Downtime 引数 recurrence はインポート未サポート

繰り返し設定がされている Downtime をインポートしても、tfstateに recurrence の値は設定されませんでした。
recurrence を追加したリソースを再度インポートしても取得できなかったため、現状では仕様のようです。

Downtime 引数 active の記載無し

ドキュメントに記載がありませんが、 active 引数が無いと差分として出力されます。
意味としては、そのDowntimeによる mute 状態となっている(true)か、なっていない(開始時刻待ち)(false)かです。

Terraform Datadog Provider を試してみる

Datadog 公式で Terraform を使った管理方法のブログが公開されていました。(多分2017/04/07公開)

Datadog Provider は結構前から用意されていたようですが、 触れたことが無かったので、ほぼDatadogブログの内容のままですが実際に使用してみます。


目次


Datadog Provider

Terraform 公式ドキュメントは以下です。

管理できるリソースは今の所以下の4つです。

  • Downtime
  • Monitor
  • Timeboard
  • User

Datadog API Key 設定

Terraform はインストール済みの前提です。 今回利用したバージョンは Terraform v0.9.2

tfvars

Datadog の API Key を設定した tfvars ファイルを作成します。

$ cat terraform.tfvars
datadog_api_key="XXXXXXXXXXXXXXXXXXXXXXXXXXXXXXXX"
datadog_app_key="YYYYYYYYYYYYYYYYYYYYYYYYYYYYYYYYYYYYYYYY"

tf

tfvars から API Key を読み込みます。main.tfとして作成しました。

$ cat main.tf
# Variables
variable "datadog_api_key" {}
variable "datadog_app_key" {}

# Configure the Datadog provider
provider "datadog" {
  api_key = "${var.datadog_api_key}"
  app_key = "${var.datadog_app_key}"
}

plan

API Key 設定を行った後、リソース部分が空の状態で plan 実行した結果が以下になります。 エラー出力されるようなら設定に何かしら誤りがあります。

$ terraform plan
Refreshing Terraform state in-memory prior to plan...
The refreshed state will be used to calculate this plan, but will not be
# Variables
persisted to local or remote state storage.

No changes. Infrastructure is up-to-date.

This means that Terraform did not detect any differences between your
configuration and real physical resources that exist. As a result, Terraform
doesn't need to do anything.

実行例(Monitor)

モニター定義を管理します。

パラメータ未指定での実行

パラメータを未指定で実行すると必須パラメータ不足のエラーとなります。

cat monitor.tf
# Monitors
resource "datadog_monitor" "cpumonitor" {
}
$ terraform plan
4 error(s) occurred:

* datadog_monitor.cpumonitors: "message": required field is not set
* datadog_monitor.cpumonitors: "name": required field is not set
* datadog_monitor.cpumonitors: "query": required field is not set
* datadog_monitor.cpumonitors: "type": required field is not set

必須パラメータ指定での実行

必須パラメータ name,type,message,query を指定してplan実行します。

$ cat monitor.tf
# Monitors
resource "datadog_monitor" "cpumonitor" {
  name = "cpu monitor"
  type = "metric alert"
  message = "CPU usage alert"
  query = "avg(last_1m):avg:system.cpu.system{*} by {host} > 60"
}
$ terraform plan
・・・
+ datadog_monitor.cpumonitor
    include_tags:        "true"
    message:             "CPU usage alert"
    name:                "cpu monitor"
    new_host_delay:      "<computed>"
    notify_no_data:      "false"
    query:               "avg(last_1m):avg:system.cpu.system{*} by {host} > 60"
    require_full_window: "true"
    type:                "metric alert"


Plan: 1 to add, 0 to change, 0 to destroy.

plan は問題無いので apply を実行します。

$ terraform apply
datadog_monitor.cpumonitor: Creating...
  include_tags:        "" => "true"
  message:             "" => "CPU usage alert"
  name:                "" => "cpu monitor"
  new_host_delay:      "" => "<computed>"
  notify_no_data:      "" => "false"
  query:               "" => "avg(last_1m):avg:system.cpu.system{*} by {host} > 60"
  require_full_window: "" => "true"
  type:                "" => "metric alert"
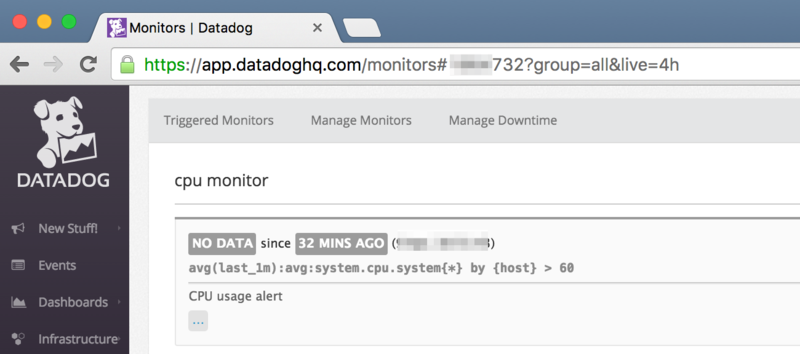
datadog_monitor.cpumonitor: Creation complete (ID: XXXX732)

Apply complete! Resources: 1 added, 0 changed, 0 destroyed.

実行結果

事前にインポートを行っていない限りは、新規作成となります。

f:id:htnosm:20170409231844p:plain

$ terraform show
datadog_monitor.cpumonitor:
  id = XXXX732
  include_tags = true
  message = CPU usage alert
  name = cpu monitor
  notify_no_data = false
  query = avg(last_1m):avg:system.cpu.system{*} by {host} > 60
  require_full_window = true
  type = metric alert
$ cat terraform.tfstate
{
    "version": 3,
    "terraform_version": "0.9.2",
    "serial": 0,
    "lineage": "f751ef78-ced3-4035-896b-aa0008b760e3",
    "modules": [
        {
            "path": [
                "root"
            ],
            "outputs": {},
            "resources": {
                "datadog_monitor.cpumonitor": {
                    "type": "datadog_monitor",
                    "depends_on": [],
                    "primary": {
                        "id": "XXXX732",
                        "attributes": {
                            "id": "XXXX732",
                            "include_tags": "true",
                            "message": "CPU usage alert",
                            "name": "cpu monitor",
                            "notify_no_data": "false",
                            "query": "avg(last_1m):avg:system.cpu.system{*} by {host} \u003e 60",
                            "require_full_window": "true",
                            "type": "metric alert"
                        },
                        "meta": {},
                        "tainted": false
                    },
                    "deposed": [],
                    "provider": ""
                }
            },
            "depends_on": []
        }
    ]
}

変更無しの状態で確認

何も変更を行っていない状態で、更新が掛からない事を確認します。

$ terraform plan
Refreshing Terraform state in-memory prior to plan...
The refreshed state will be used to calculate this plan, but will not be
persisted to local or remote state storage.

datadog_monitor.cpumonitor: Refreshing state... (ID: XXXX732)
No changes. Infrastructure is up-to-date.

This means that Terraform did not detect any differences between your
configuration and real physical resources that exist. As a result, Terraform
doesn't need to do anything.
$ terraform apply
datadog_monitor.cpumonitor: Refreshing state... (ID: XXXX732)

Apply complete! Resources: 0 added, 0 changed, 0 destroyed.

更新

閾値を追加して更新を行います。

$ cat monitor.tf
# Monitors
resource "datadog_monitor" "cpumonitor" {
  name = "cpu monitor"
  type = "metric alert"
  message = "CPU usage alert"
  query = "avg(last_1m):avg:system.cpu.system{*} by {host} > 60"
  thresholds {
    ok = 20
    warning = 50
    critical = 60
  }
}
$ terraform plan
・・・
datadog_monitor.cpumonitor: Refreshing state... (ID: XXXX732)
・・・

~ datadog_monitor.cpumonitor
    thresholds.%:        "0" => "3"
    thresholds.critical: "" => "60"
    thresholds.ok:       "" => "20"
    thresholds.warning:  "" => "50"


Plan: 0 to add, 1 to change, 0 to destroy.
$ terraform apply
datadog_monitor.cpumonitor: Refreshing state... (ID: XXXX732)
datadog_monitor.cpumonitor: Modifying... (ID: XXXX732)
  thresholds.%:        "0" => "3"
  thresholds.critical: "" => "60"
  thresholds.ok:       "" => "20"
  thresholds.warning:  "" => "50"
datadog_monitor.cpumonitor: Modifications complete (ID: XXXX732)

Apply complete! Resources: 0 added, 1 changed, 0 destroyed.
・・・

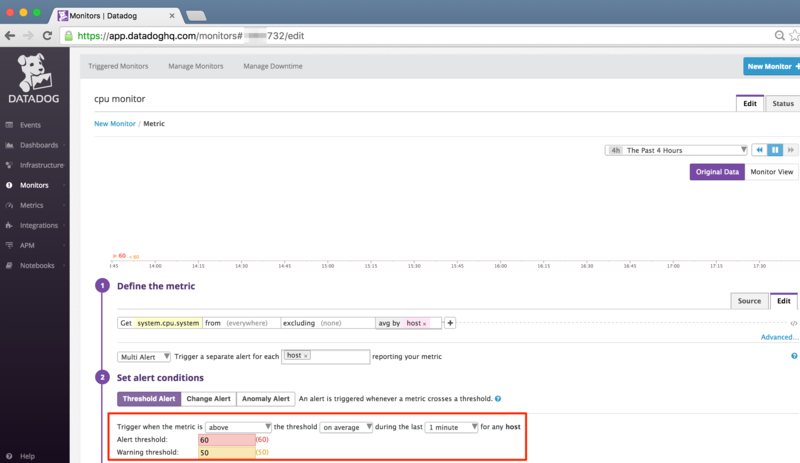
更新結果

閾値設定されたことを確認できます。

f:id:htnosm:20170409231845p:plain

$ terraform show
datadog_monitor.cpumonitor:
  id = XXXX732
  escalation_message =
  include_tags = true
  locked = false
  message = CPU usage alert
  name = cpu monitor
  new_host_delay = 300
  no_data_timeframe = 0
  notify_audit = false
  notify_no_data = false
  query = avg(last_1m):avg:system.cpu.system{*} by {host} > 60
  renotify_interval = 0
  require_full_window = true
  silenced.% = 0
  tags.# = 0
  thresholds.% = 3
  thresholds.critical = 60.0
  thresholds.ok = 20.0
  thresholds.warning = 50.0
  timeout_h = 0
  type = metric alert

show結果を見ると、指定していないパラメータについても値が出力されています。
注意点としては、これらのデフォルト値は Datadog API ではなく、 Terraform provider 側で指定される事です。

削除

Terraformで管理している設定の削除を実行します。

$ terraform destroy
Do you really want to destroy?
  Terraform will delete all your managed infrastructure.
  There is no undo. Only 'yes' will be accepted to confirm.

  Enter a value: yes

datadog_monitor.cpumonitor: Refreshing state... (ID: XXXX732)
datadog_monitor.cpumonitor: Destroying... (ID: XXXX732)
datadog_monitor.cpumonitor: Destruction complete

Destroy complete! Resources: 1 destroyed.

f:id:htnosm:20170409231846p:plain

AWS EC2 インスタンス起動と合わせて Monitor 作成

他Providerと組み合わせる例として EC2インスタンスとの連携例がありました。

ec2.tf

$ cat ec2.tf
# Configure the AWS Provider
provider "aws" {
  access_key = "${var.aws_access_key}"
  secret_key = "${var.aws_secret_key}"
  region     = "ap-northeast-1"
}

resource "aws_instance" "base" {
  ami = "ami-859bbfe2" # Amazon Linux AMI 2017.03.0 (HVM), SSD Volume Type
  instance_type = "t2.micro"
}

resource "datadog_monitor" "cpumonitor" {
  name = "cpu monitor ${aws_instance.base.id}"
  type = "metric alert"
  message = "CPU usage alert"
  query = "avg(last_1m):avg:system.cpu.system{host:${aws_instance.base.id}} by {host} > 10"
  new_host_delay = 30
}

plan

$ terraform plan
・・・
+ aws_instance.base
    ami:                         "ami-859bbfe2"
    associate_public_ip_address: "<computed>"
    availability_zone:           "<computed>"
    ebs_block_device.#:          "<computed>"
    ephemeral_block_device.#:    "<computed>"
    instance_state:              "<computed>"
    instance_type:               "t2.micro"
    ipv6_addresses.#:            "<computed>"
    key_name:                    "<computed>"
    network_interface_id:        "<computed>"
    placement_group:             "<computed>"
    private_dns:                 "<computed>"
    private_ip:                  "<computed>"
    public_dns:                  "<computed>"
    public_ip:                   "<computed>"
    root_block_device.#:         "<computed>"
    security_groups.#:           "<computed>"
    source_dest_check:           "true"
    subnet_id:                   "<computed>"
    tenancy:                     "<computed>"
    vpc_security_group_ids.#:    "<computed>"

+ datadog_monitor.cpumonitor
    include_tags:        "true"
    message:             "CPU usage alert"
    name:                "cpu monitor ${aws_instance.base.id}"
    new_host_delay:      "30"
    notify_no_data:      "false"
    query:               "avg(last_1m):avg:system.cpu.system{host:${aws_instance.base.id}} by {host} > 10"
    require_full_window: "true"
    type:                "metric alert"


Plan: 2 to add, 0 to change, 0 to destroy.

apply

$ terraform apply
aws_instance.base: Creating...
  ami:                         "" => "ami-859bbfe2"
  associate_public_ip_address: "" => "<computed>"
  availability_zone:           "" => "<computed>"
  ebs_block_device.#:          "" => "<computed>"
  ephemeral_block_device.#:    "" => "<computed>"
  instance_state:              "" => "<computed>"
  instance_type:               "" => "t2.micro"
  ipv6_addresses.#:            "" => "<computed>"
  key_name:                    "" => "<computed>"
  network_interface_id:        "" => "<computed>"
  placement_group:             "" => "<computed>"
  private_dns:                 "" => "<computed>"
  private_ip:                  "" => "<computed>"
  public_dns:                  "" => "<computed>"
  public_ip:                   "" => "<computed>"
  root_block_device.#:         "" => "<computed>"
  security_groups.#:           "" => "<computed>"
  source_dest_check:           "" => "true"
  subnet_id:                   "" => "<computed>"
  tenancy:                     "" => "<computed>"
  vpc_security_group_ids.#:    "" => "<computed>"
aws_instance.base: Still creating... (10s elapsed)
aws_instance.base: Still creating... (20s elapsed)
aws_instance.base: Creation complete (ID: i-0XXXXXXXXXXX6f52e)
datadog_monitor.cpumonitor: Creating...
  include_tags:        "" => "true"
  message:             "" => "CPU usage alert"
  name:                "" => "cpu monitor i-0XXXXXXXXXXX6f52e"
  new_host_delay:      "" => "30"
  notify_no_data:      "" => "false"
  query:               "" => "avg(last_1m):avg:system.cpu.system{host:i-0XXXXXXXXXXX6f52e} by {host} > 10"
  require_full_window: "" => "true"
  type:                "" => "metric alert"
datadog_monitor.cpumonitor: Creation complete (ID: XXXX862)

Apply complete! Resources: 2 added, 0 changed, 0 destroyed.
・・・
|        AZ        |      InstanceId       | InstanceType  |  State   |
+------------------+-----------------------+---------------+----------+
|  ap-northeast-1a |  i-0XXXXXXXXXXX6f52e  |  t2.micro     |  running |

f:id:htnosm:20170409233431p:plain

WebUI上での手動更新を行う

変更点が無い状態であることを確認します。

$ terraform plan
・・・
aws_instance.base: Refreshing state... (ID: i-0XXXXXXXXXXX6f52e)
datadog_monitor.cpumonitor: Refreshing state... (ID: XXXX862)
No changes. Infrastructure is up-to-date.
・・・

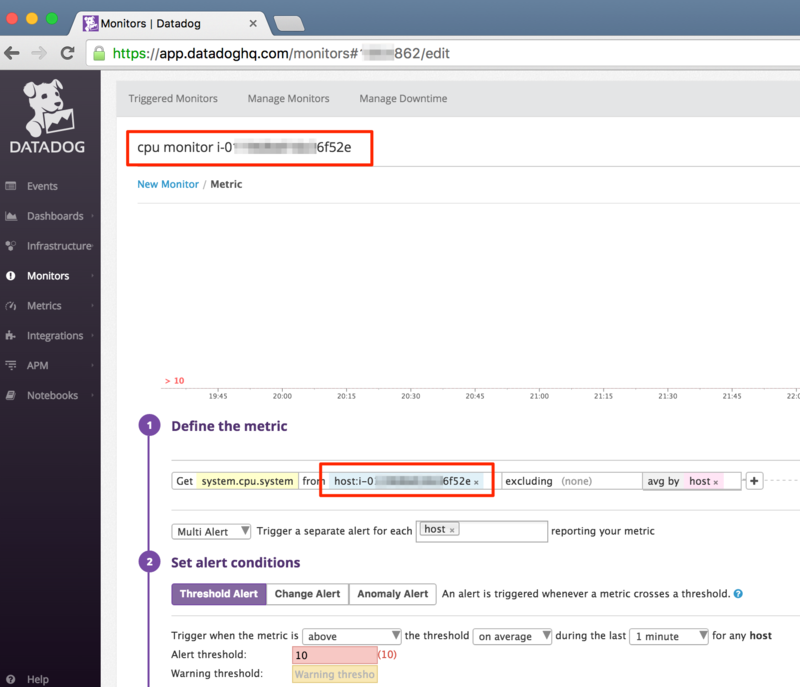
DatadogのWebUI上でMonitorを更新します。

f:id:htnosm:20170409231848p:plain

再度planを実行します。

$ terraform plan -target datadog_monitor.cpumonitor
・・・
aws_instance.base: Refreshing state... (ID: i-0XXXXXXXXXXX6f52e)
datadog_monitor.cpumonitor: Refreshing state... (ID: XXXX862)
・・・
~ datadog_monitor.cpumonitor
    name:                "cpu monitor terraform-dd-test" => "cpu monitor i-0XXXXXXXXXXX6f52e"
    no_data_timeframe:   "2" => "0"
    thresholds.%:        "1" => "0"
    thresholds.critical: "10.0" => ""


Plan: 0 to add, 1 to change, 0 to destroy.

変更をしていないパラメータも変更有りと認識されるようになってしまいました。 Datadog Provider に限りませんが、意図しない更新には注意が必要です。

まとめ

Terraform でのホスト管理にDatadog監視設定も併せて設定できます。 Datadog上のリソースはID指定となっているため、他の設定に影響することも無く、使い勝手は良いと思います。
期間限定で起動するインスタンスで他の設定に影響を与えず、管理・更新する等で使えそうです。

Datadog DogPushの使い方

Datadog の Help でも紹介されている、Monitor の管理ツールの DogPush に触れる機会があったので、使い方をまとめます。

f:id:htnosm:20170402235739j:plain


目次


前提・注意事項

基本的には全Monitorが対象

タグ等による絞り込み機能はありません。 出力や比較には全 Monitor の定義が使用されます。

同名 Monitor は未サポート

Datadog の Monitor は 同名の物を定義できますが、dogpush では未サポートとなります。
Monitor 名称で管理しているため重複エラーとなります。 dogpush に限らず、 Datadog のツール系はこの制約に引っ掛かる事が多い気がします。

$ dogpush init
Duplicate name: MonitorTest4
Traceback (most recent call last):
  File "/usr/bin/dogpush", line 5, in <module>
    dogpush.main()
  File "/usr/lib/python2.7/site-packages/dogpush/dogpush.py", line 397, in main
    args.command()
  File "/usr/lib/python2.7/site-packages/dogpush/dogpush.py", line 215, in command_init
    remote_monitors = [m['obj'] for m in get_datadog_monitors().values()]
  File "/usr/lib/python2.7/site-packages/dogpush/dogpush.py", line 139, in get_datadog_monitors
    'Duplicate names found in remote datadog monitors.')
dogpush.dogpush.DogPushException: Duplicate names found in remote datadog monitors.

Message が空の Monitor は未サポート

f:id:htnosm:20170402235740p:plain

実運用ではあまり無いかと思いますが、 現バージョンでは本文部分が空の場合に失敗します。Web UI 上では空での作成は不可ですが、APIだと作成できてしまいます。
message 部分に以下のようなメッセージが含まれてしまい、出力内容をそのまま利用することができません。

- message: !!python/unicode ''

一見上記部分を排除すれば利用できそうですが、重複エラーに引っ掛かります。

インストール

README を参考にインストールを行います。 今回は素に近い CentOS7 で試してます。必要パッケージは環境により変わると思います。

$ cat /etc/redhat-release
CentOS Linux release 7.3.1611 (Core)
$ python -V
Python 2.7.5
$ sudo yum install python2-pip openssl-devel python-devel libffi-devel
・・・
Complete!
$ pip -V
pip 8.1.2 from /usr/lib/python2.7/site-packages (python 2.7)
$ sudo pip install -U pip dogpush
・・・
Successfully installed PyYAML-3.12 datadog-0.15.0 decorator-4.0.11 dogpush-0.3.3 pip-9.0.1 pytz-2017.2 requests-2.13.0 simplejson-3.10.0
$ pip -V
pip 9.0.1 from /usr/lib/python2.7/site-packages (python 2.7)
$ dog -v
dog 0.15.0
$ dogpush -h
usage: dogpush [-h] [--config CONFIG] {init,push,diff,mute} ...

positional arguments:
  {init,push,diff,mute}
                        sub-command help
    init                init new alerts file
    push                push monitors to datadog
    diff                show diff between local monitors and datadog
    mute                Mute alerts based on their `mute_when` key

optional arguments:
  -h, --help            show this help message and exit
  --config CONFIG, -c CONFIG
                        configuration file to load (default: ./config.yaml)

datadog パッケージが依存関係として含まれるため、 dogshell(dogコマンド)もインストールされます。
尚、後述 delete_untracked オプションで記載していますが、バージョンが古いようでしたので再度 GitHub からインストールし直しています。

config.yaml ファイル

Datadog の Key 情報を定義する config.yaml が無いとエラーとなります。

$ dogpush init
Traceback (most recent call last):
  File "/usr/bin/dogpush", line 3, in <module>
    from dogpush import dogpush
  File "/usr/lib/python2.7/site-packages/dogpush/dogpush.py", line 391, in <module>
    CONFIG = _load_config(args.config)
  File "/usr/lib/python2.7/site-packages/dogpush/dogpush.py", line 29, in _load_config
    with open(config_file, 'r') as f:
IOError: [Errno 2] No such file or directory: './config.yaml'

config.yaml の作成

Datadog の API Key、App Key を記載します。

cat <<_EOF > config.yaml
datadog:
  api_key: XXXXXXXXXXXXXXXXXXXXXXXXXXXXXXXX
  app_key: xxxxxxxxxxxxxxxxxxxxxxxxxxxxxxxxxxxxxxxx
_EOF

デフォルトルール(default_rules)

パラメータ未指定時の既定値となる値を指定します。 README 上は multi,message とありますが、 実際は multi,type かと思います。

ルール 既定値 内容
multi False Multi アラートか否か {true, false}
type metric alert モニターのタイプ {metric alert, service check, event alert}

init,diff 時は config で指定した値は未出力となり、 push 時は既定値として設定されます。 そのため、本来 metric alert である設定項目に対し、service check をデフォルト値とした場合等はAPIエラーとなります。

$ dogpush push
Pushing 1 new monitors.
Traceback (most recent call last):
  File "/usr/bin/dogpush", line 5, in <module>
    pkg_resources.run_script('DogPush==0.3.3', 'dogpush')
  File "/usr/lib/python2.7/site-packages/pkg_resources.py", line 540, in run_script
    self.require(requires)[0].run_script(script_name, ns)
  File "/usr/lib/python2.7/site-packages/pkg_resources.py", line 1455, in run_script
    execfile(script_filename, namespace, namespace)
  File "/usr/lib/python2.7/site-packages/DogPush-0.3.3-py2.7.egg/EGG-INFO/scripts/dogpush", line 5, in <module>
    dogpush.main()
  File "/usr/lib/python2.7/site-packages/DogPush-0.3.3-py2.7.egg/dogpush/dogpush.py", line 407, in main
    args.command(args)
  File "/usr/lib/python2.7/site-packages/DogPush-0.3.3-py2.7.egg/dogpush/dogpush.py", line 230, in command_push
    datadog.api.Monitor.create(**_prepare_monitor(local_monitors[name]))
  File "/usr/lib/python2.7/site-packages/datadog/api/resources.py", line 40, in create
    attach_host_name=attach_host_name, **params)
  File "/usr/lib/python2.7/site-packages/datadog/api/api_client.py", line 150, in submit
    raise ApiError(response_obj)
datadog.api.exceptions.ApiError: {'errors': ["The value provided for parameter 'query' is invalid"]}

デフォルトルールオプション(default_rule_options)

使い方がわかりませんでした。 config.yaml へ記述すると AssertionError となってしまい、利用できませんでした。
ルールファイル(〜.yaml) へ記述して既定値を設定するのかと思いましたが、ルールファイルへの記述は無視されました。

チーム(teams)

通知設定を記述できます。 config.yaml へ通知先の指定を行い、各ルールファイルの先頭で定義したteamを指定します。
各 monitor 設定で severity を指定することで通知先の振分が行えます。

  • config.yamlへの記載例
    • シングルクォート囲み必須
    • servirity は CRITICAL がデフォルト、その他は任意文字列可
teams:
  team-A:
    notifications:
      CRITICAL: '@hoge@example.com @slack-XXXXX'
      WARNING: '@hoge@example.com'
      INFO: '通知無し'
      FATAL: 'Fatal @all'
  team-B:
    notifications:
      CRITICAL: '@hoge@example.com'
  • ルール yaml への記載例(team)
$ head -n 3 monitors.team*
==> monitors.team1.yaml <==
team: team-A

alerts:

==> monitors.team2.yaml <==
team: team-B

alerts:
  • ルール yaml への記載例(severity)
- message: 'Test Team Alert 1-1'
  name: TeamAlert1-1
  options: {new_host_delay: 300, require_full_window: true, thresholds: {critical: 50.0, warning: 30.0}}
  query: avg(last_5m):max:system.cpu.user{*} by {host} >= 50

- message: 'Test Team Alert 1-2'
  name: TeamAlert1-2
  options: {new_host_delay: 300, require_full_window: true, thresholds: {critical: 50.0, warning: 30.0}}
  query: avg(last_5m):max:system.cpu.user{*} by {host} >= 50
  severity: WARNING

- message: 'Test Team Alert 1-3'
  name: TeamAlert1-3
  options: {new_host_delay: 300, require_full_window: true, thresholds: {critical: 50.0, warning: 30.0}}
  query: avg(last_5m):max:system.cpu.user{*} by {host} >= 50
  severity: INFO

- message: 'Test Team Alert 1-4'
  name: TeamAlert1-4
  options: {new_host_delay: 300, require_full_window: true, thresholds: {critical: 50.0, warning: 30.0}}
  query: avg(last_5m):max:system.cpu.user{*} by {host} >= 50
  severity: FATAL

message 末尾に通知設定を追加することができます。

{"name":"TeamAlert1-1","message":"Test Team Alert 1-1\n@hoge@example.com @slack-XXXXX"}
{"name":"TeamAlert1-2","message":"Test Team Alert 1-2\n@hoge@example.com"}
{"name":"TeamAlert1-3","message":"Test Team Alert 1-3\n通知無し"}
{"name":"TeamAlert1-4","message":"Test Team Alert 1-4\nFatal @all"}

init コマンド

全 Monitor を対象とした YAML を出力します。
絞り込みのオプションはありません。

usage: dogpush init [-h]

実行例

そのまま実行すると標準出力となるため、リダイレクトなどでファイル出力とすることになると思います。

$ dogpush init
# team: TEAMNAME

alerts:

- message: 'Test2: alert message to @hoge@example.com'
  multi: true
  name: MonitorTest2
  options: {new_host_delay: 300, notify_no_data: false, require_full_window: true}
  overall_state_modified: 'yyyy-mm-ddThh:mm:ss.560069+00:00'
  query: avg(last_5m):max:system.cpu.user{*} by {host} >= 50

- message: 'Test3: alert message to @hoge@example.com'
  multi: true
・・・略
$ dogpush init > my_monitors.yaml
$

diff コマンド

Datadog 上の Monitor 登録内容とローカルのYAMLとの比較を行います。
対象とする monitor 定義(ここでは my_monitors.yaml) を config.yaml へ追加した上で利用します。

cat <<_EOF >> config.yaml
rule_files:
- my_monitors.yaml
_EOF

差分が無い場合は何も出力されません。

$ dogpush diff
$

差分がある場合は diff 結果が出力されます。

$ dogpush diff
---------------------------------------------------------
 TO BE UPDATED.  These monitors exist in datadog, but are
 different than the local version.  Use "dogpush push"
 to push them to datadog.
---------------------------------------------------------

--- datadog:MonitorTest2
+++ /home/vagrant/dogpush/my_monitors.yaml:MonitorTest2
@@ -1,4 +1,4 @@
-message: 'Test2: alert message to @hoge@example.com'
+message: 'Test2: alert message to @hoge@example.com Update'
 multi: true
 name: MonitorTest2
 options: {new_host_delay: 300, notify_no_data: false, require_full_window: true}
$

差分が name の場合は更新ではなく、新規追加として扱われます。

$ dogpush diff
---------------------------------------------------------
 NEW MONITORS.  These monitors are currently missing in
 datadog and can be pushed using "dogpush push"
---------------------------------------------------------

- message: MonitorTest1
  multi: true
  name: MonitorTest1 Update
  options:
    new_host_delay: 300
    no_data_timeframe: 2
    notify_no_data: false
    renotify_interval: 0
    require_full_window: true
    thresholds: {critical: 50.0}
    timeout_h: 0
  overall_state_modified: 'yyyy-mm-ddThh:mm:ss.560069+00:00'
  query: avg(last_5m):max:system.cpu.user{*} by {host} >= 50

------------------------------------------------------------
 UNTRACKED MONITORS.  These monitors are only in datadog
 and needed to be MANUALLY added to a local file or removed
 from datadog.
------------------------------------------------------------

- message: MonitorTest1
  multi: true
  name: MonitorTest1
  options:
    new_host_delay: 300
    no_data_timeframe: 2
    notify_no_data: false
    renotify_interval: 0
    require_full_window: true
    thresholds: {critical: 50.0}
    timeout_h: 0
  overall_state_modified: 'yyyy-mm-ddThh:mm:ss.560069+00:00'
  query: avg(last_5m):max:system.cpu.user{*} by {host} >= 50

*** FAILED *** Untracked monitors found.

push コマンド

Datadog 上の Monitor へローカルのYAMLの変更点を反映します。
対象とする monitor を config.yaml へ追加した上で利用します。

usage: dogpush push [-h]
$ dogpush push
Pushing 1 new monitors.
Updating 1 modified alerts

削除は行われません。 その為、 nameの変更を行った場合は別途削除が必要になります。

  • name を更新した場合、更新前の情報が残る
------------------------------------------------------------
 UNTRACKED MONITORS.  These monitors are only in datadog
 and needed to be MANUALLY added to a local file or removed
 from datadog.
------------------------------------------------------------

- message: MonitorTest1
  multi: true
  name: MonitorTest1
  options:
    new_host_delay: 300
    no_data_timeframe: 2
    notify_no_data: false
    renotify_interval: 0
    require_full_window: true
    thresholds: {critical: 50.0}
    timeout_h: 0
  overall_state_modified: 'yyyy-mm-ddThh:mm:ss.560069+00:00'
  query: avg(last_5m):max:system.cpu.user{*} by {host} >= 50

*** FAILED *** Untracked monitors found.

delete_untracked オプション

yaml に含まれていない monitor を削除するオプションです。
pip からインストールした物は少々バージョンが古いようで、使用できませんでした。

$ dogpush push --delete_untracked
usage: dogpush [-h] [--config CONFIG] {init,push,diff,mute} ...
dogpush: error: unrecognized arguments: --delete_untracked

GitHub 上では追加されているようでしたので、 git clone して再導入します。

# pip でインストールしたバージョンの削除
$ sudo pip uninstall dogpush
Uninstalling DogPush-0.3.3:
  /usr/bin/dogpush
  /usr/lib/python2.7/site-packages/DogPush-0.3.3-py2.7.egg
Proceed (y/n)? y
  Successfully uninstalled DogPush-0.3.3
# GitHub からインストール
$ git clone https://github.com/trueaccord/DogPush.git
$ cd DogPush
$ sudo python setup.py install
・・・
Finished processing dependencies for DogPush==0.3.3
# dlete_untracked オプションが追加されていることを確認
$ dogpush push -h
usage: dogpush push [-h] [-d]

optional arguments:
  -h, --help            show this help message and exit
  -d, --delete_untracked
                        Delete untracked monitors.

オプションを付けた状態で実行すると monitor の削除が行われます。

$ dogpush push --delete_untracked
Deleting 1 untracked monitors.
$ dogpush diff
$

mute コマンド

mute_tags を定義済みの Monitor へ Downtime を設定します。

usage: dogpush mute [-h]

mute_tags 定義

config.yaml へ mute 対象時間帯の定義を行い、各 monitor 設定で mute_when を指定することで mute 対象モニターとします。

  • config.yamlへの記載例
mute_tags:
  mute_a:
    timezone: Asia/Tokyo
    expr: now.hour < 10 or now.hour > 19
  • ルール yaml への記載例(mute_when)
- message: 'Test MuteAlert'
  name: MuteAlert
  options: {new_host_delay: 300, require_full_window: true, thresholds: {critical: 50.0, warning: 30.0}}
  query: avg(last_5m):max:system.cpu.user{*} by {host} >= 50
  mute_when: mute_a
  • 実行例
$ dogpush mute
Muting alert 'MuteAlert' until yyyy-mm-dd 10:00:00+09:00

対象モニターが mute 状態となります。

f:id:htnosm:20170402235741p:plain

Downtimes でも確認できます。

f:id:htnosm:20170402235742p:plain

まとめ

Datadog 公式の dogshell には monitor の pull/push がありません(ダッシュボード screenboard/timeboard 操作は用意されていますが、 monitor はありません。)ので、 その部分を補完できると思います。
注意事項に記載した通りいくつか制約はありますが、 YAML での記述となるので、JSONファイルよりは扱い易いかと思いました。